
Edelrid
Locking
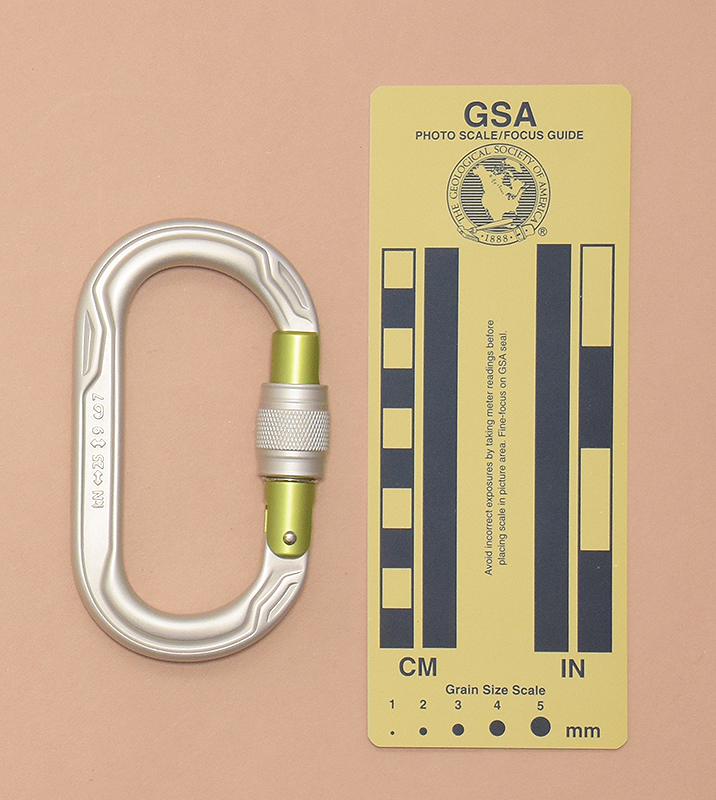
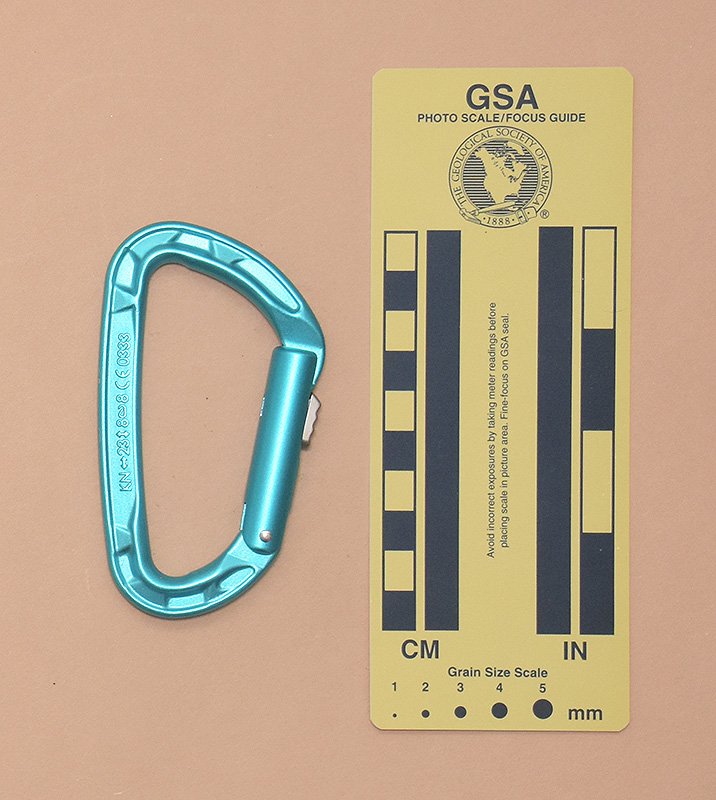
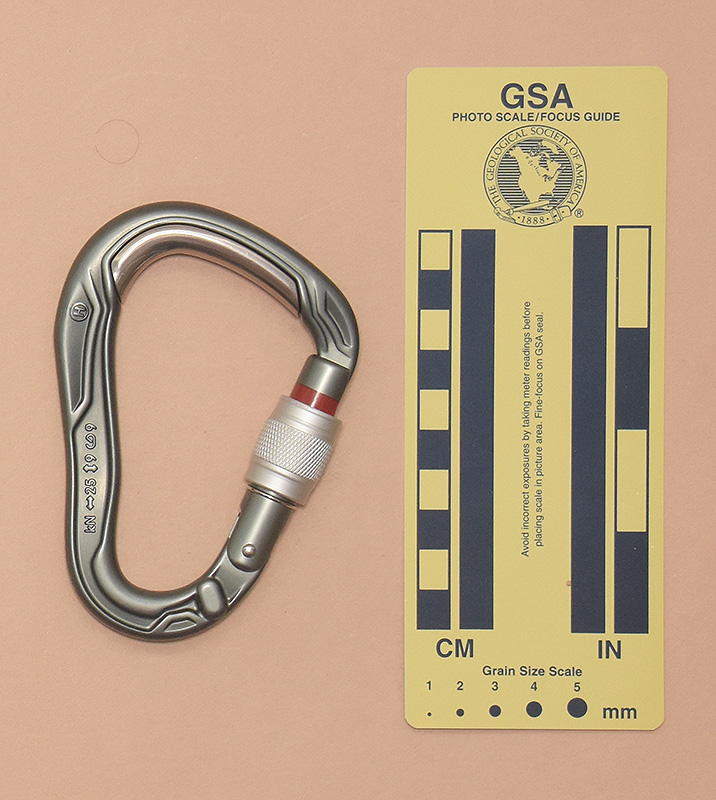
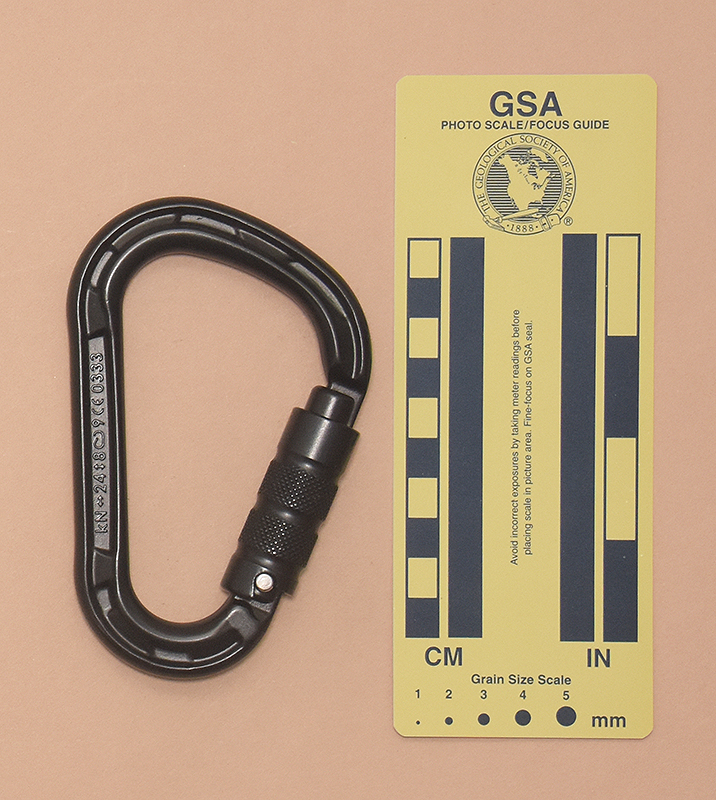
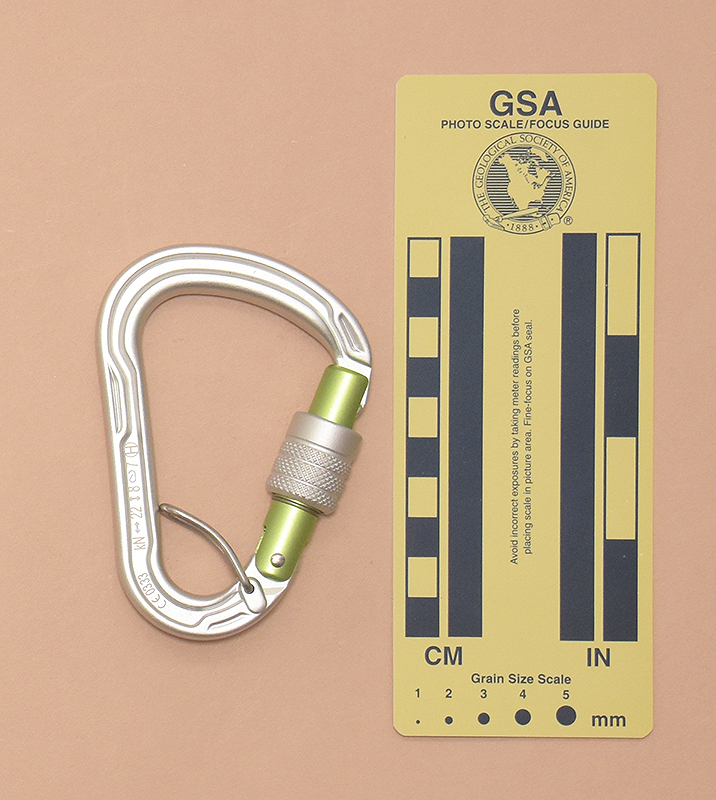
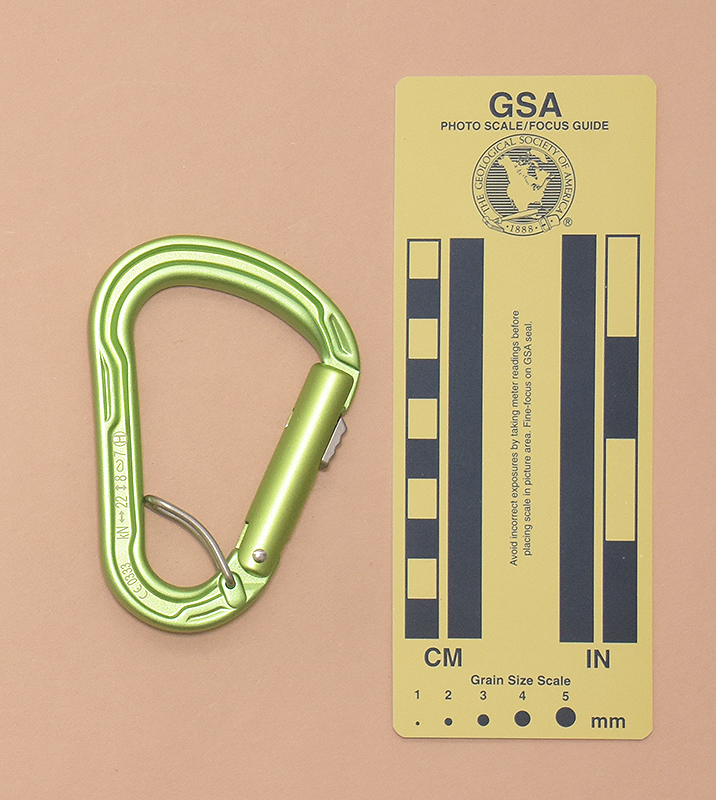
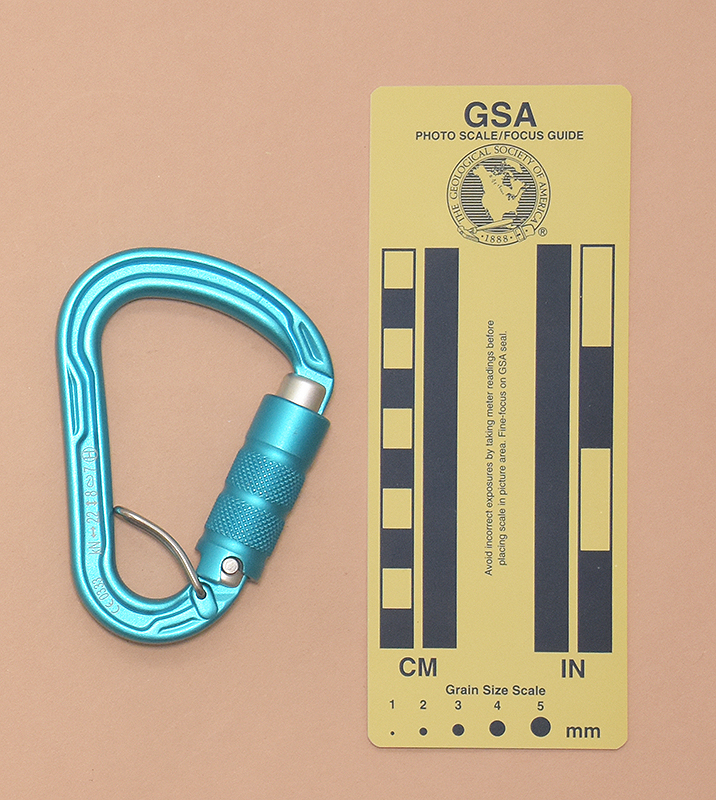
↑ 502: Edelrid Oval Power 2500 Screw
- 111x63 mm., 72 g.
- Gate Opening: 20 mm., Clearance: 20 mm.
- kN ↔25 ↕9 ⱷ7
EDELRID <iBook> CE 0321
<factory> 2019 08 C02421 EN362:2004/B 88265
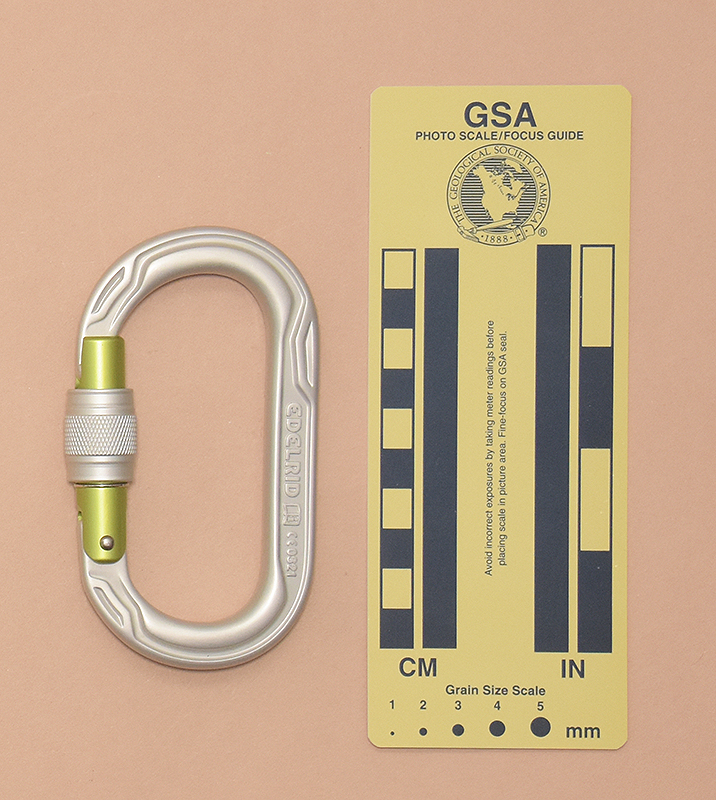
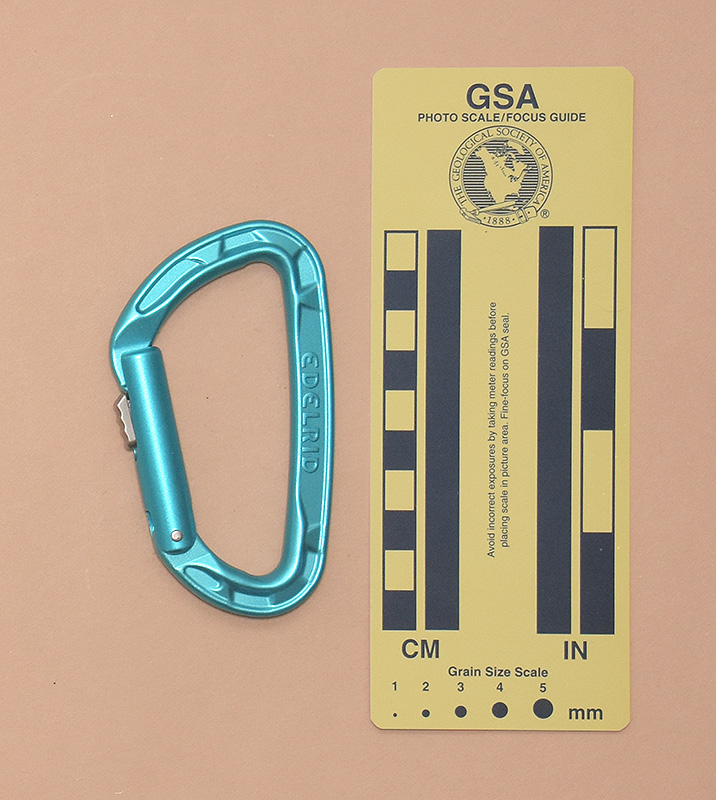
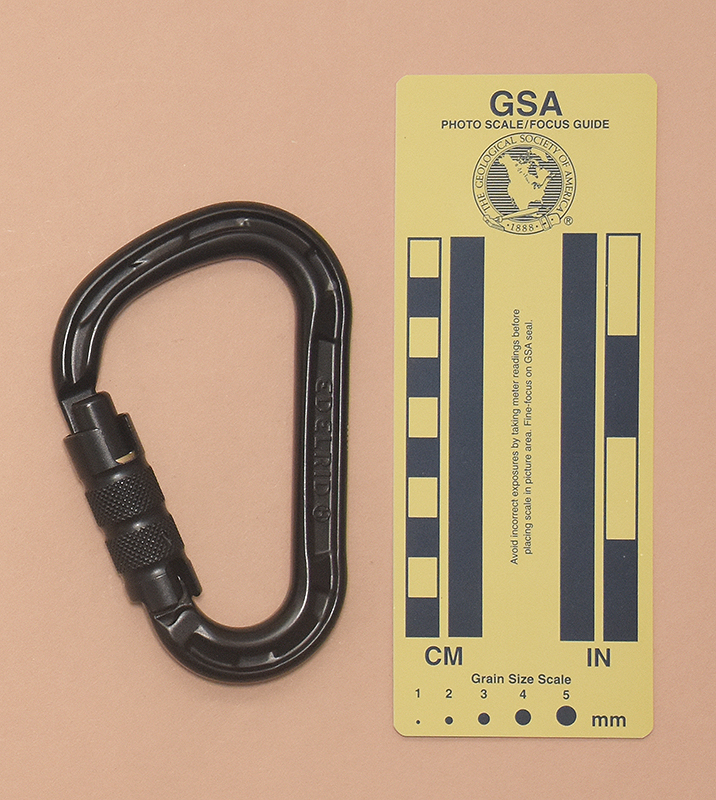
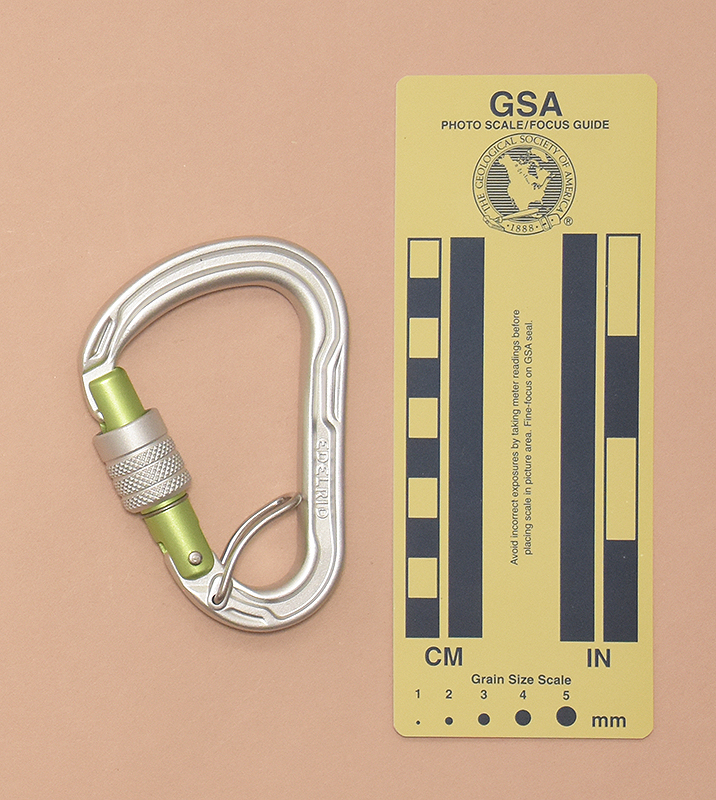
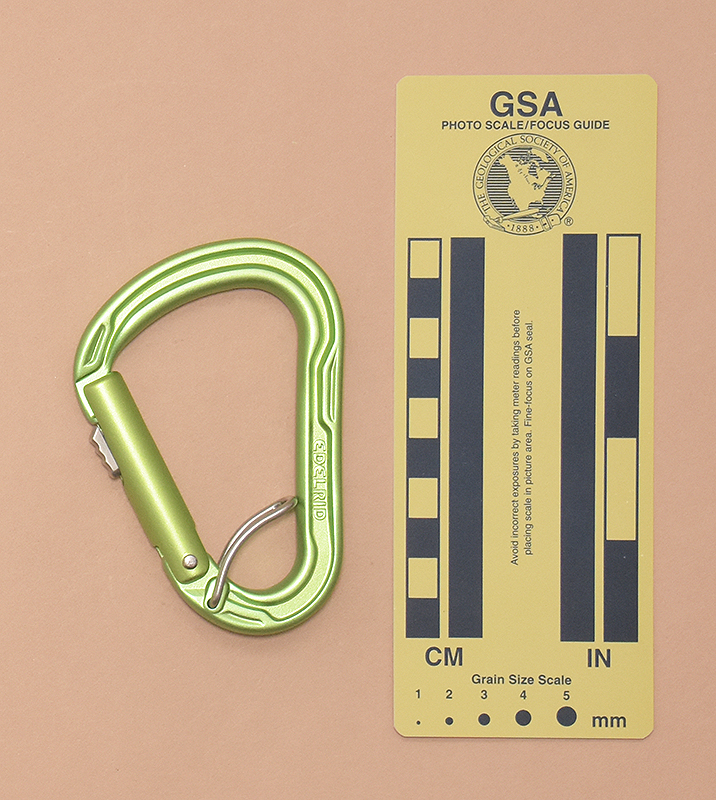
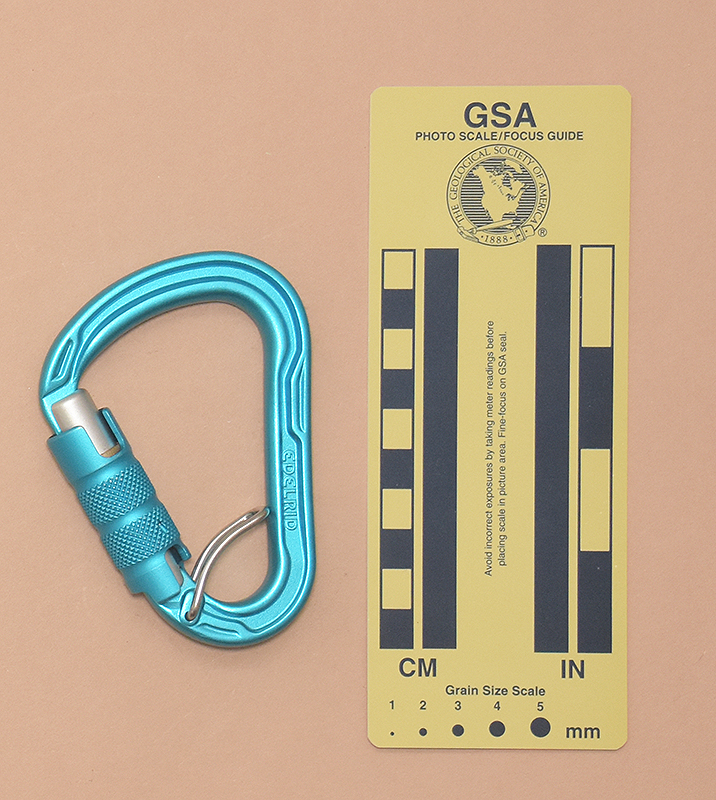
↑ 504: Edelrid Oval Power 2500 Permalock
- 111x63 mm., 73 g.
- Gate Opening: 21 mm., Clearance: 21 mm.
- kN ↔25 ↕9 ⱷ7
EDELRID <iBook> CE 0321
85203 0562 <factory> 2021 12 EN362:2004/B <QR code>
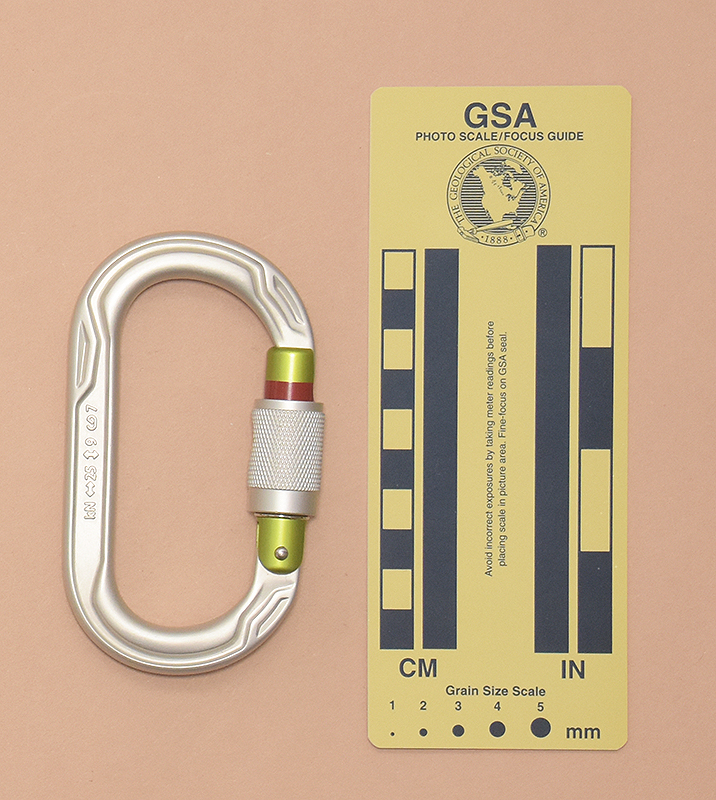
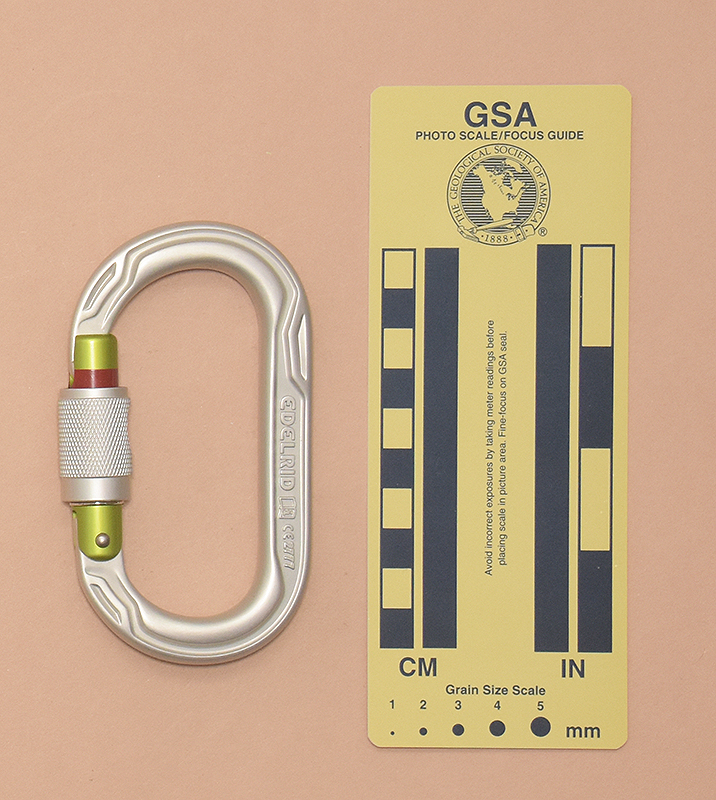
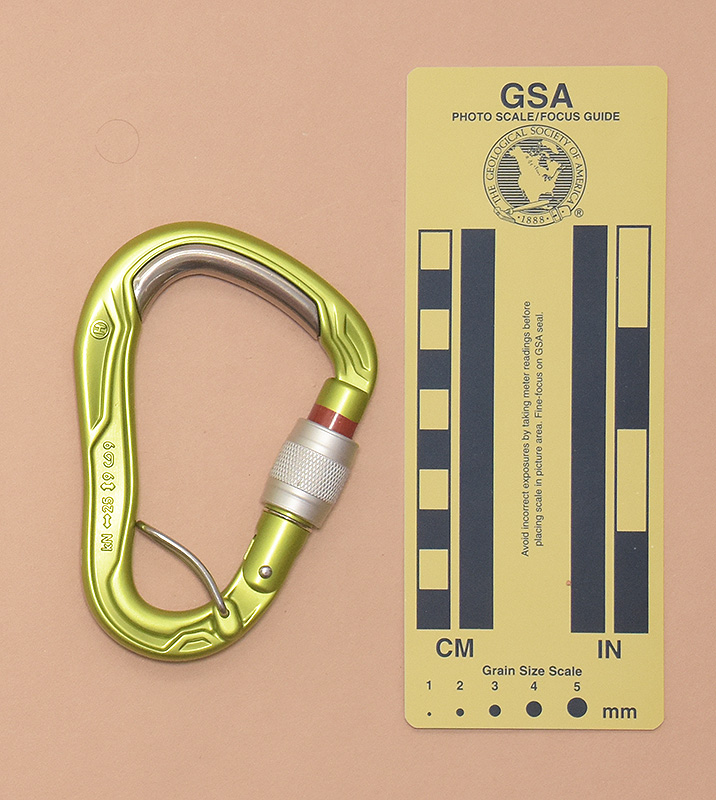
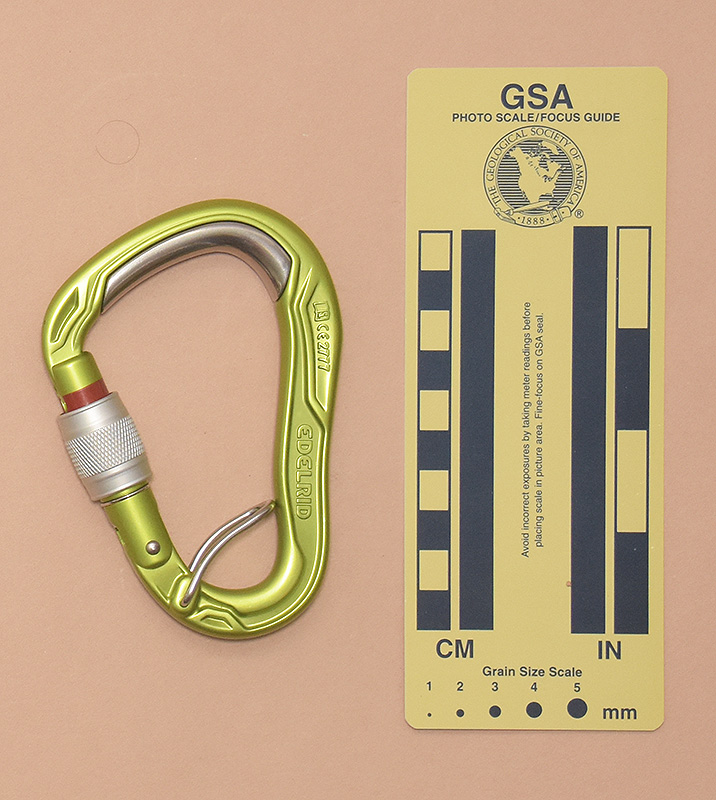
↑ 503: Edelrid Oval Power 2500 Triple
- 111x63 mm., 77 g.
- Gate Opening: 20 mm., Clearance: 20 mm.
- kN ↔25 ↕9 ⱷ7
EDELRID <iBook> CE 0321
88267 0891 <factory> 2021 03 EN362:2004/B <QR code>
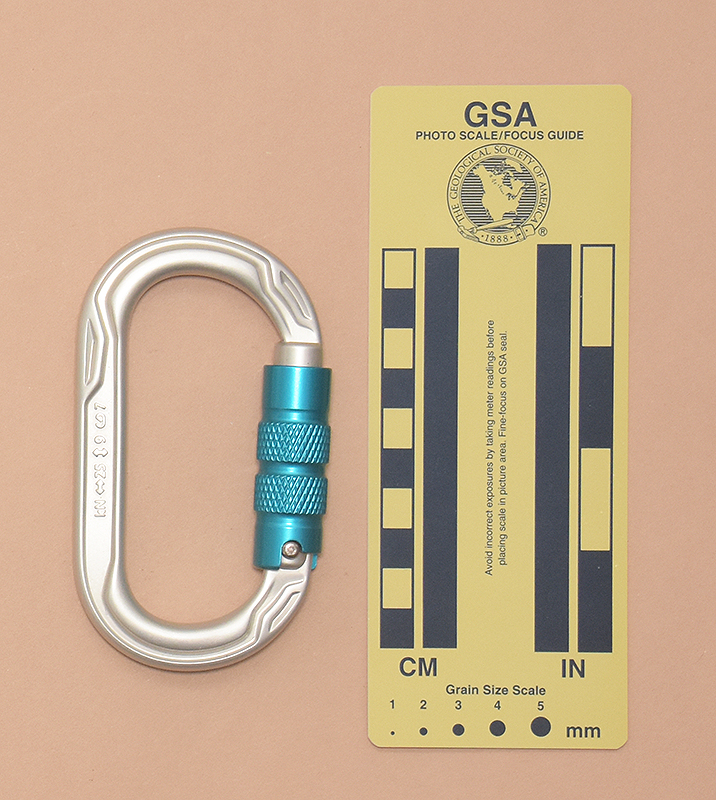
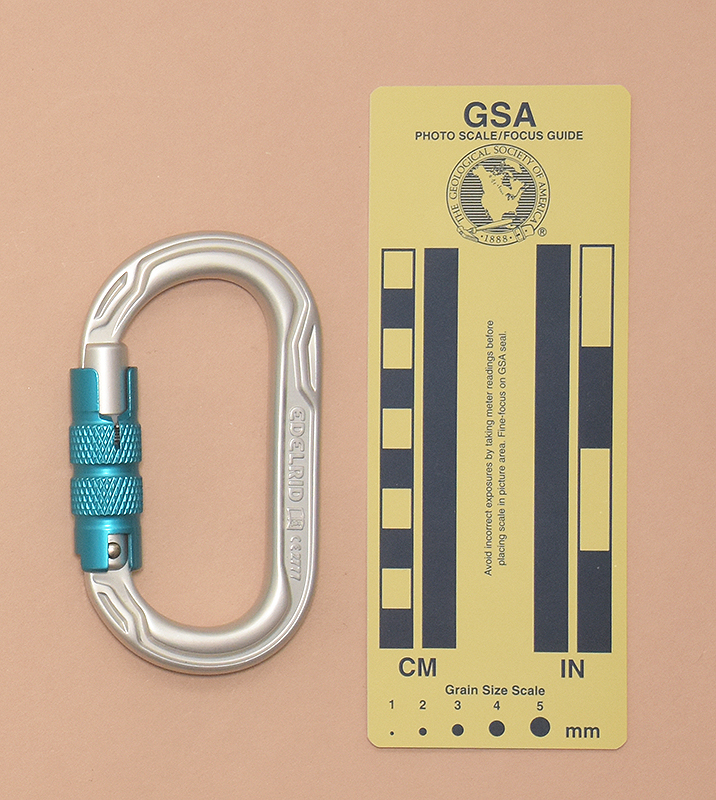
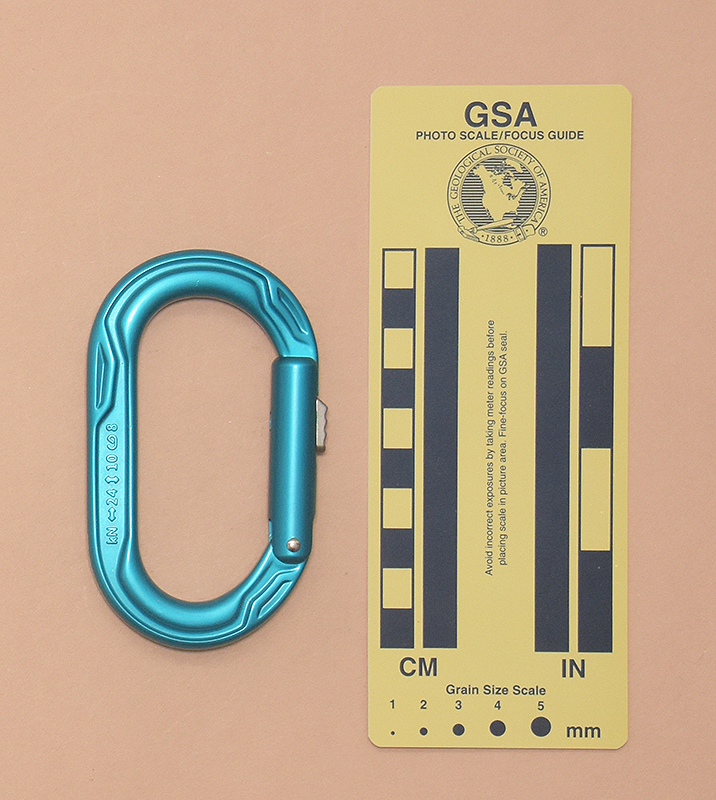
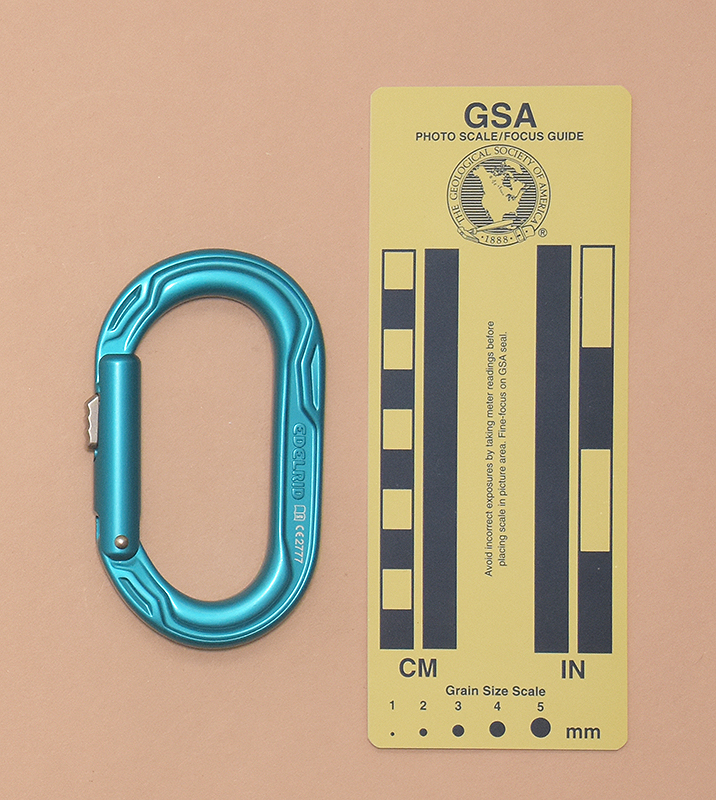
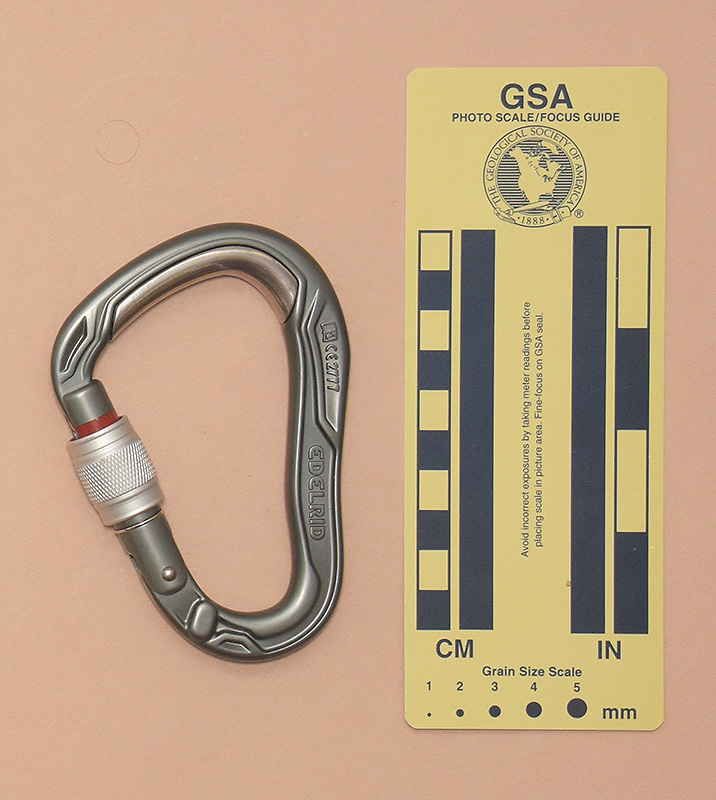
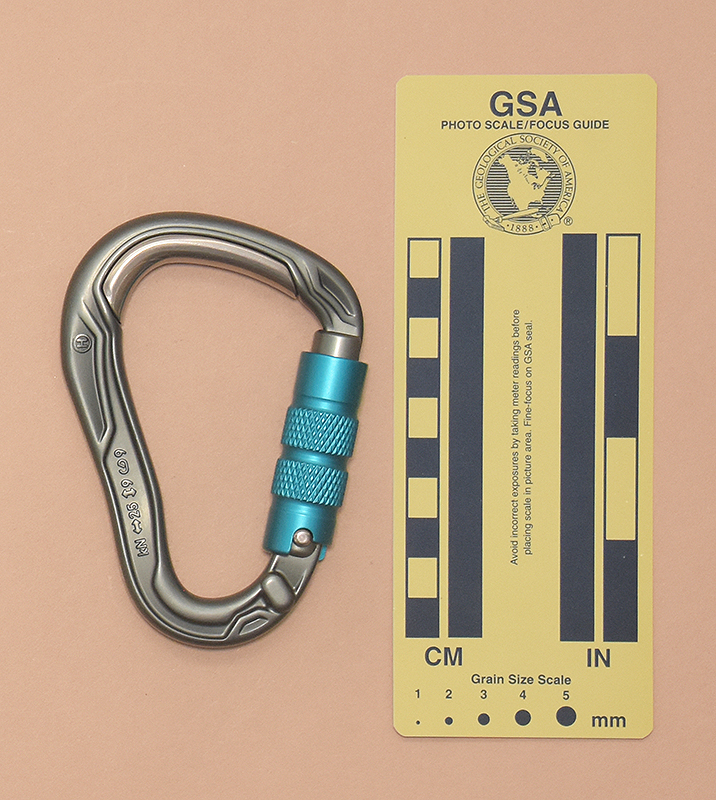
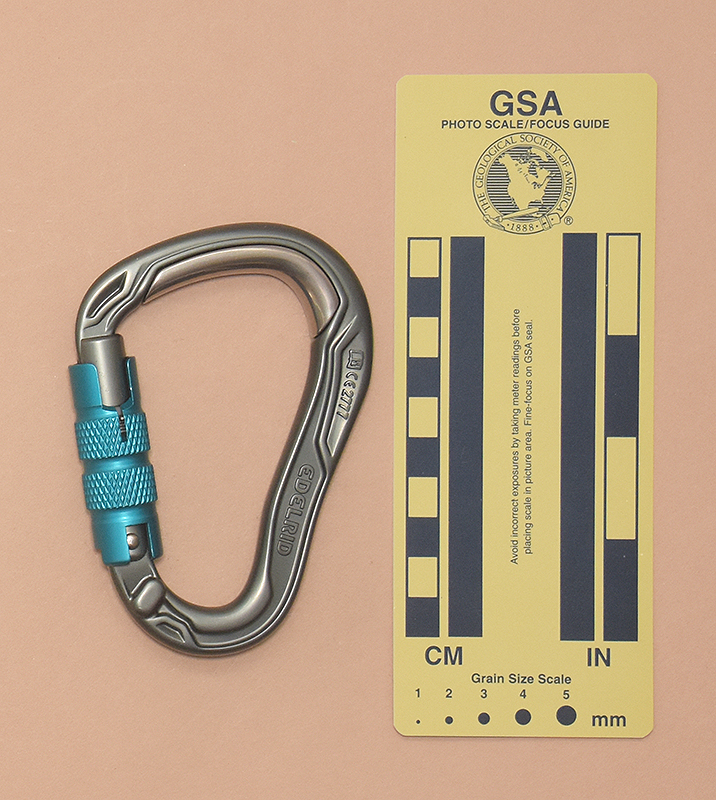
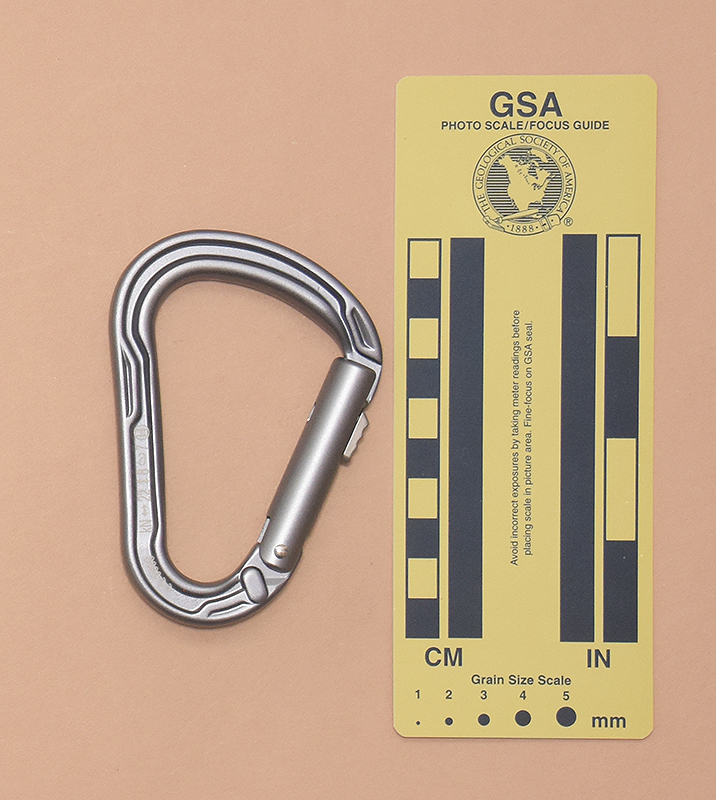
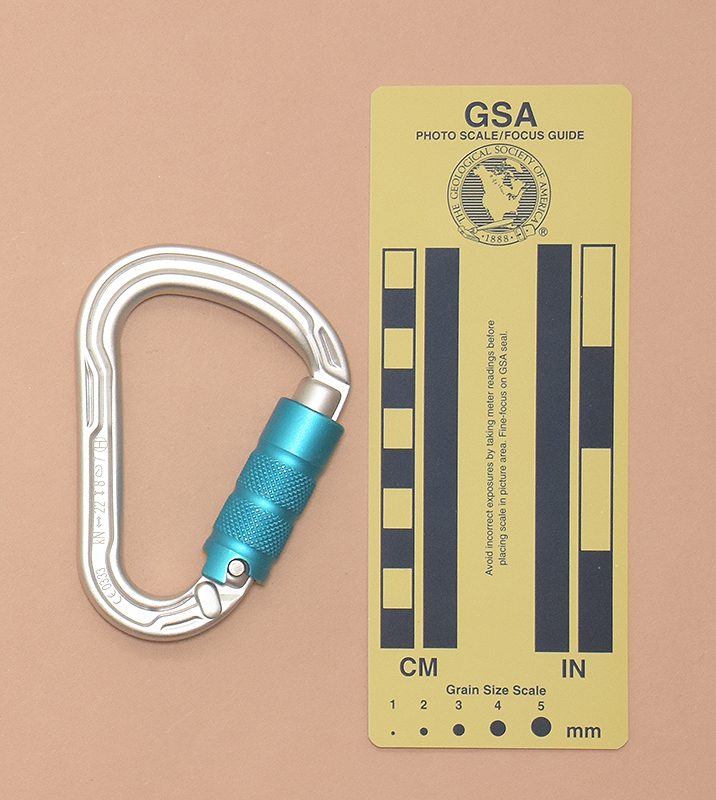
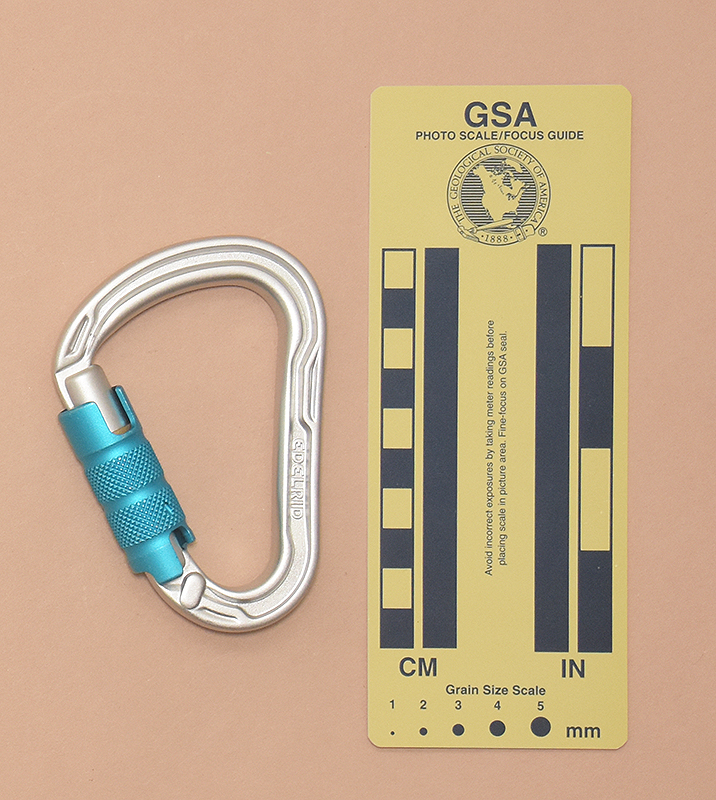
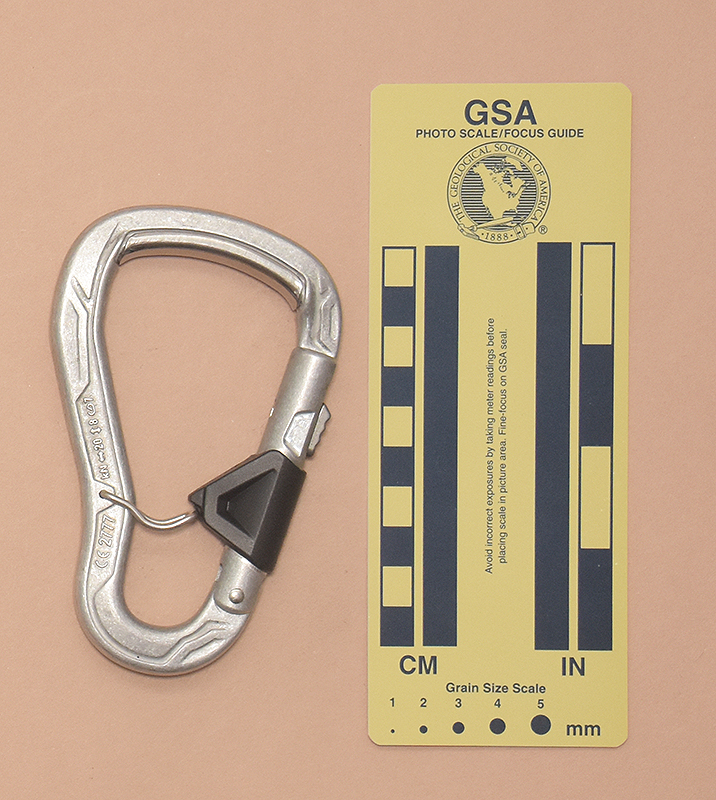
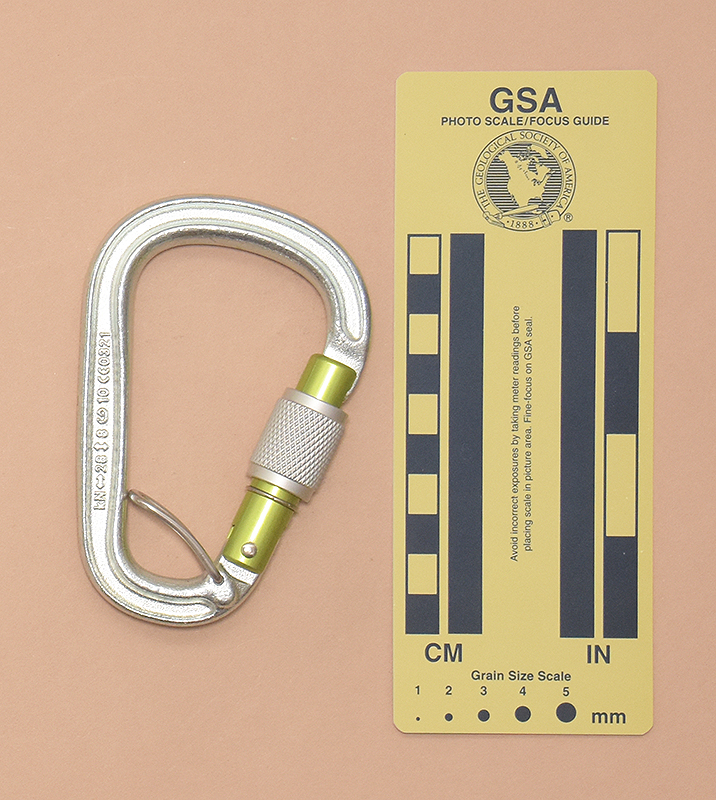
↑ 021: Edelrid Bulletproof Screw
- 101x59 mm., 59 g.
- Gate Opening: 18 mm., Clearance: 18 mm.
- kN ↔27 ↕10 ⱷ8 B>
<iBook> CE2777 EDELRID
73724 3125 <factory> 2022 11 03 - Stainless steel wear insert inside top.
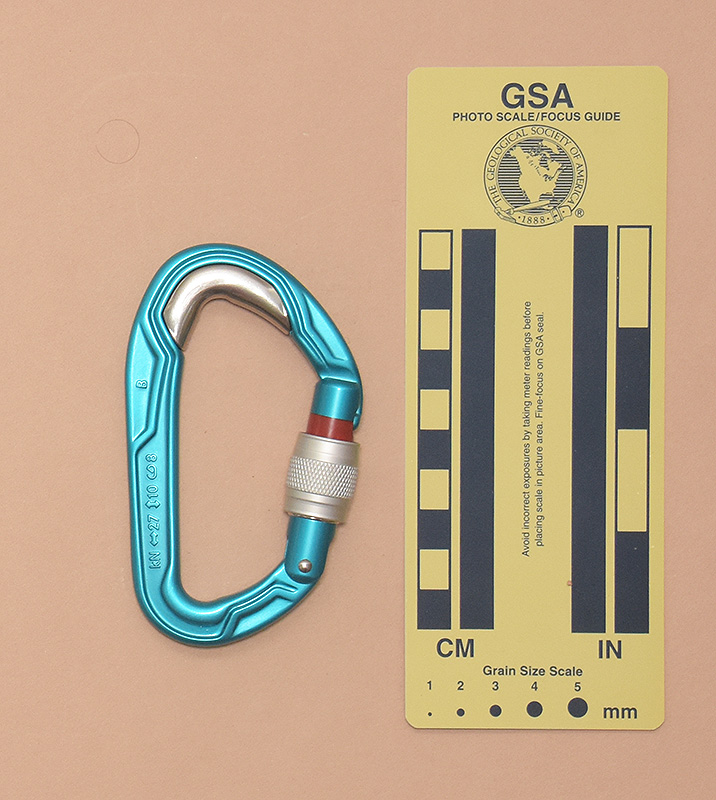
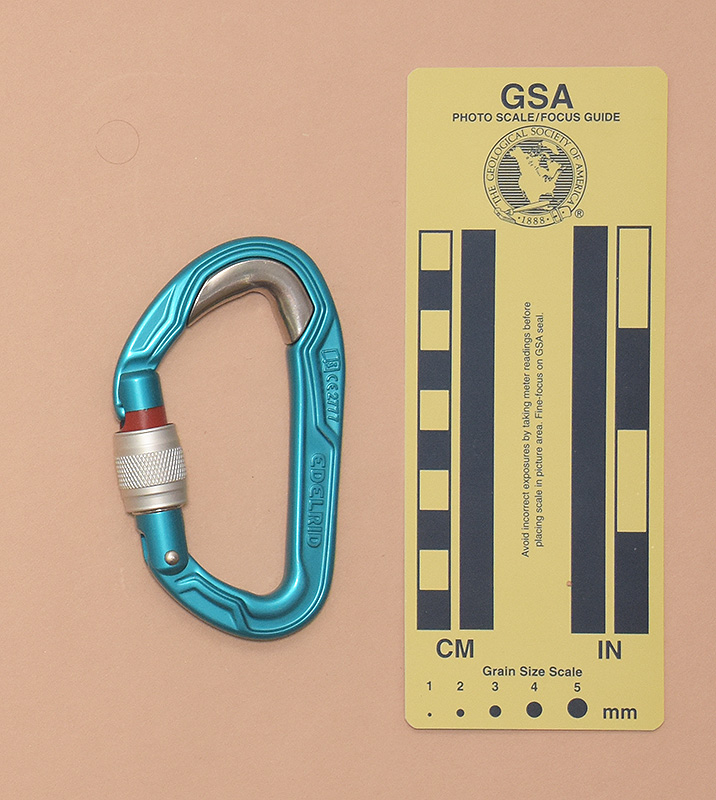
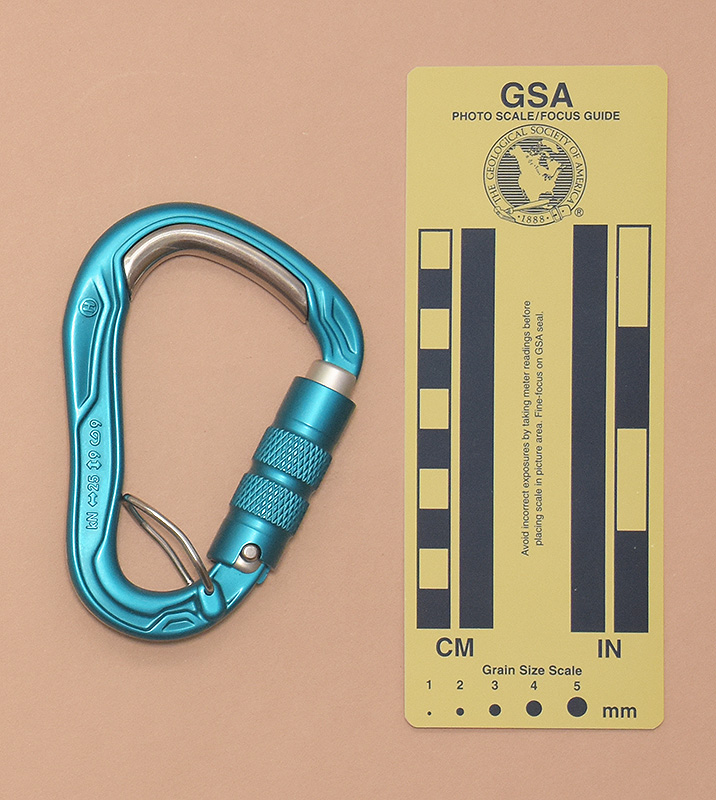
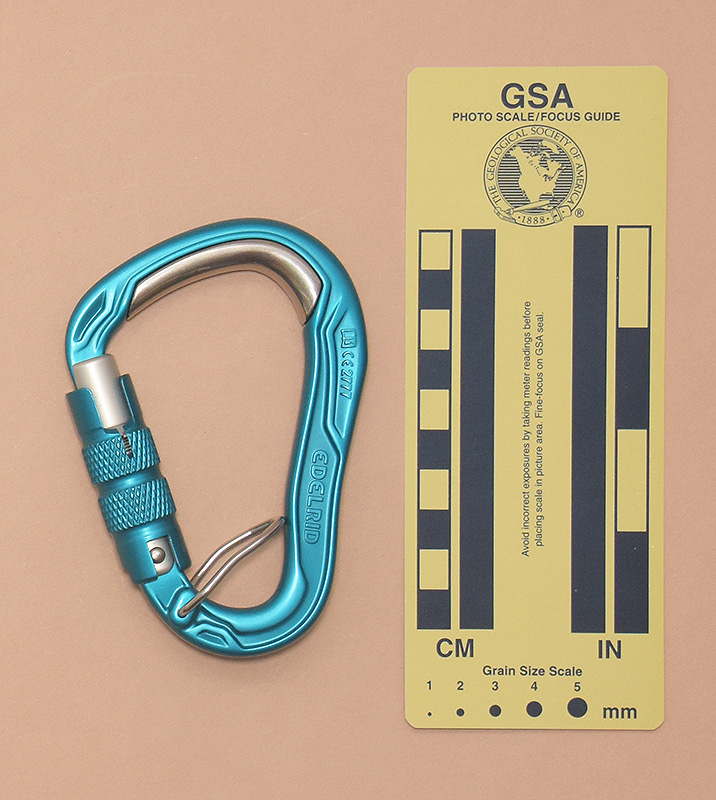
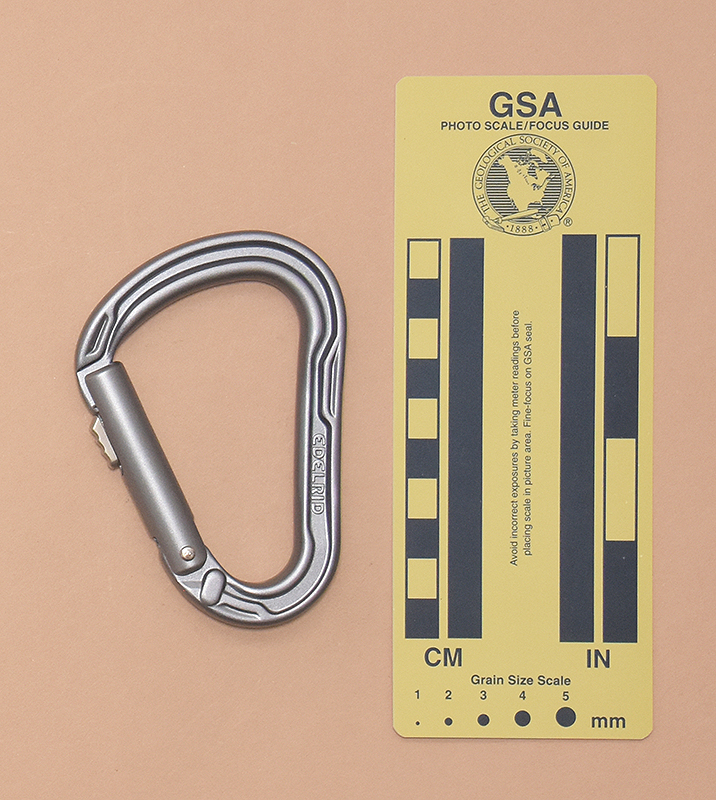
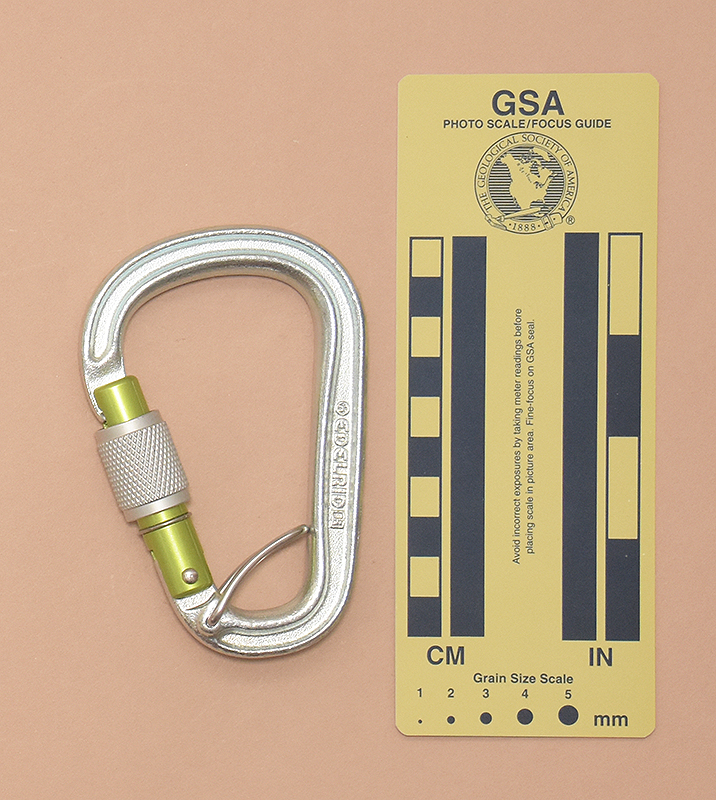
↑ 501: Edelrid Kiwi Slider
- 100x59 mm., 59 g.
- Gate Opening: 20 mm., Clearance: 19 mm.
- kN ↔24↕10ⱷ8
EDELRID <iBook>CE2777
73755 0549 <factory> 2021 03 EN 362:2004/X <QR Code>
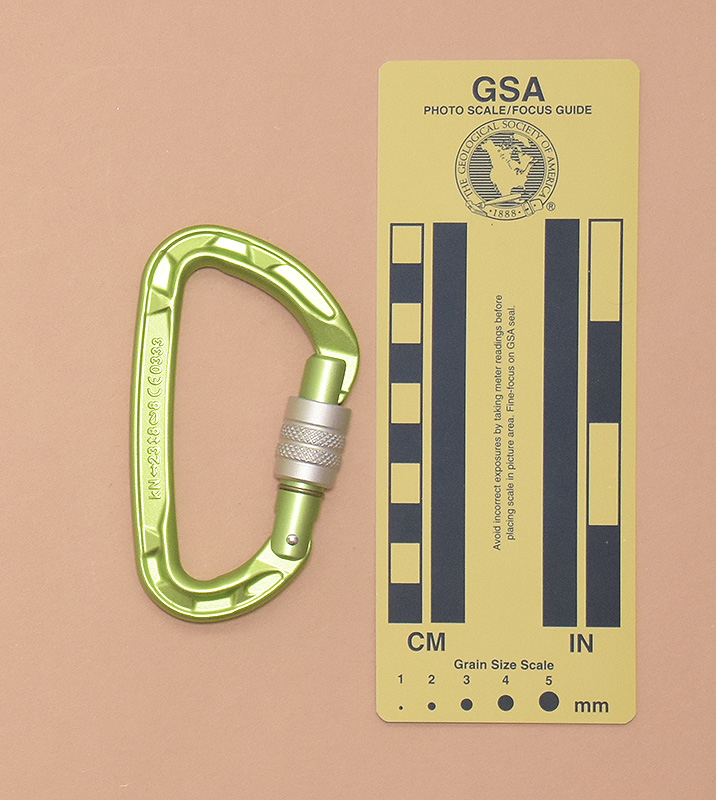
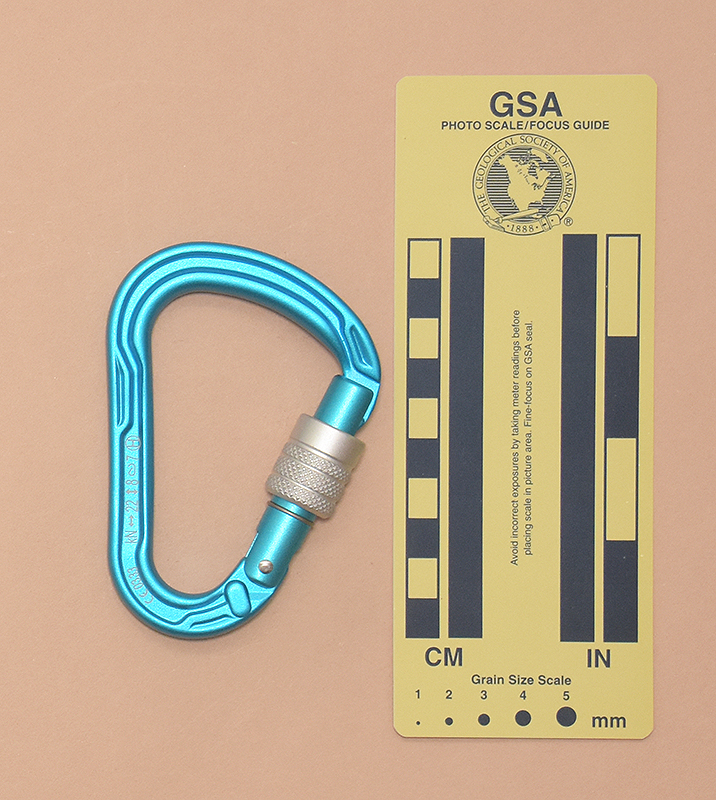
↑ 399: Edelrid Pure Screw
- 99x56 mm., 44 g.
- Gate Opening: 17 mm., Clearance: 17 mm.
- kN↔23↕8ⱷ8 CE 0333
Edelrid
EN 362:2004/B (B)<factory> 2022 03 <iBook> 71770-0222-87 -0896
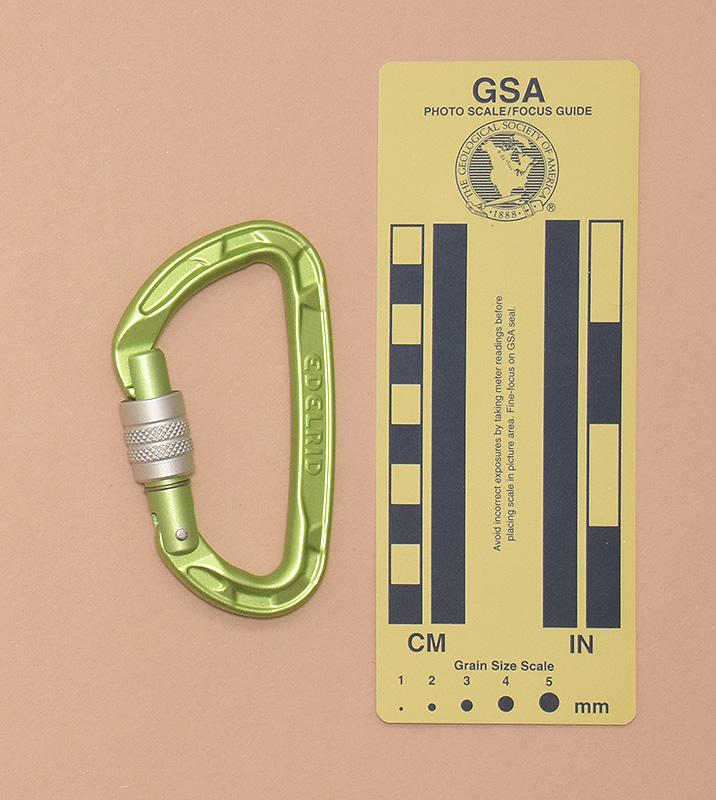
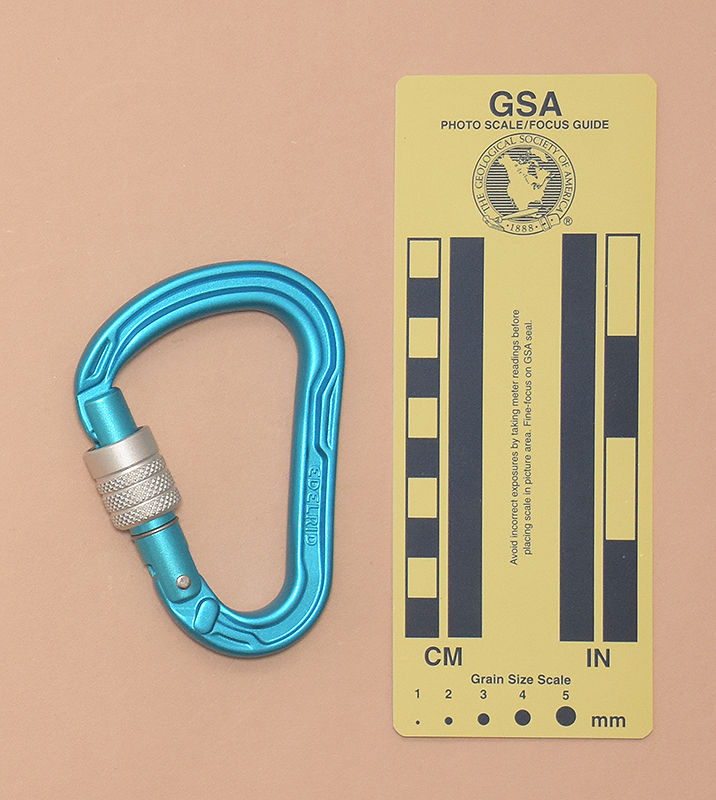
↑ 402: Edelrid Pure Slider
- 99x56 mm., 44 g.
- Gate Opening: 17 mm., Clearance: 17 mm.
- kN↔23↕8ⱷ8 CE 0333
Edelrid
EN 362:2004/B (B)<factory> 2021 06 <iBook> 22002-0820168-0157
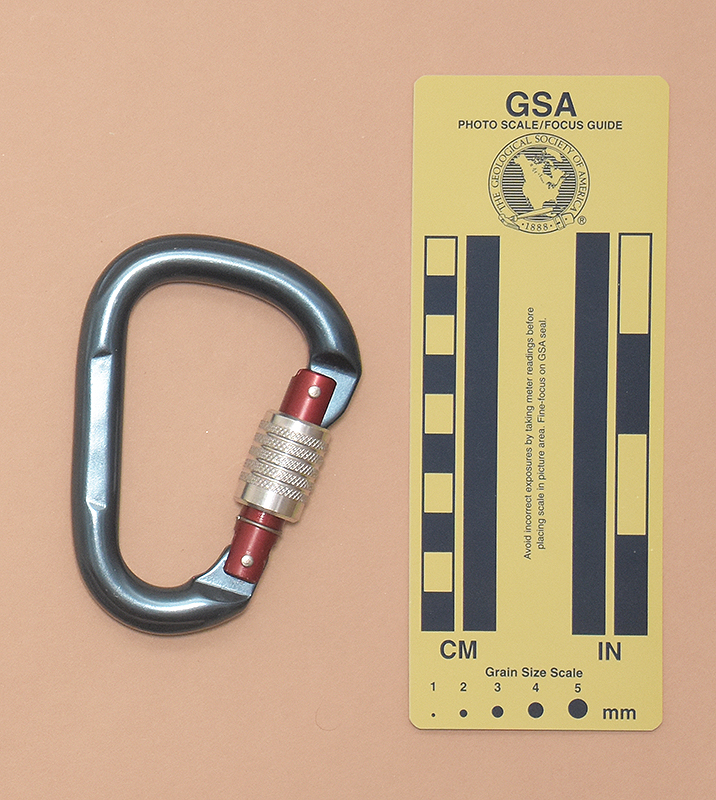
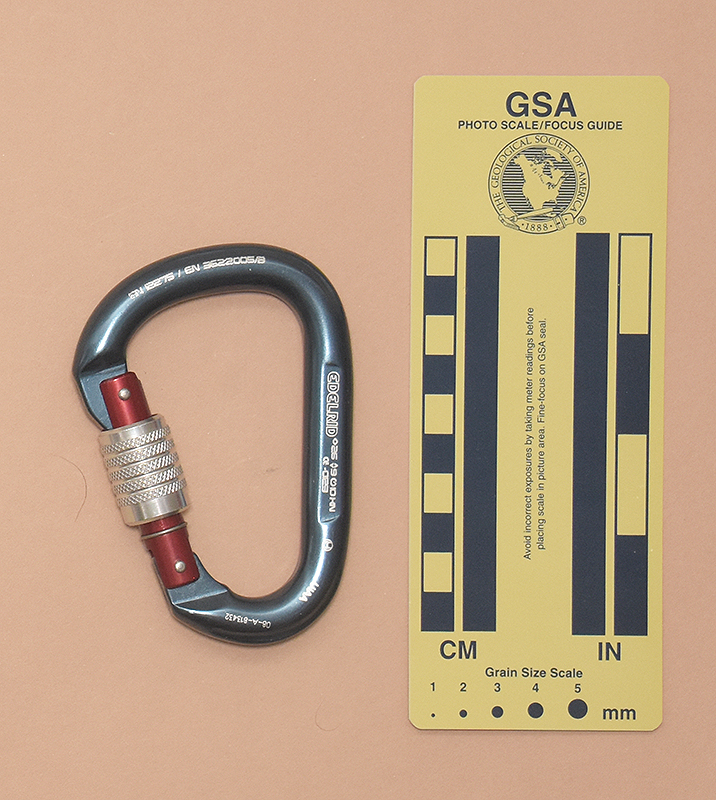
↑ 199: Edelrid HMS
- 101x71 mm., 82 g.
- Gate Opening: 20 mm., Clearance: 20 mm.
- -
EN12275 / EN362:2005/B EDELRID ↔25↕9ⱷ10KN CE-0123 (H) UIAA 08-A-813432Pr
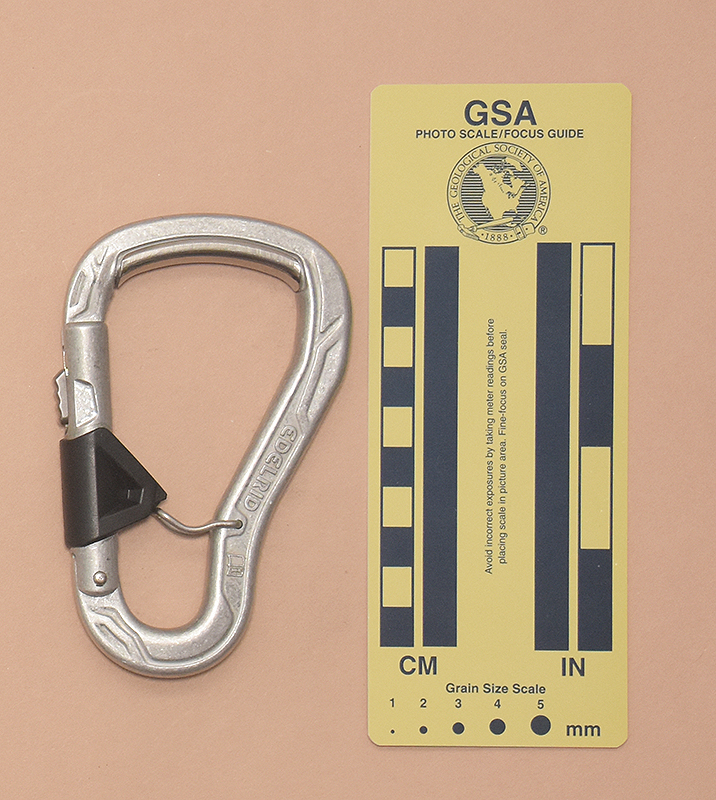
↑ 022: Edelrid HMS Bulletproof Screw
- 110x75 mm., 81 g.
- Gate Opening: 24 mm., Clearance: 24 mm.
- kN ↔25 ↕9 ⱷ9 (H)
<iBook> CE2777 EDELRID
73725 2192 <factory> 2022 11 03 EN 362:2004/B <QRcode> - Stainless steel wear insert inside top.
↑ 023: Edelrid HMS Bulletproof Screw FG
- 109x75 mm., 84 g.
- Gate Opening: 24 mm., Clearance: 23 mm.
- kN ↔25 ↕9 ⱷ9 (H)
<iBook> CE2777 EDELRID
73726 1730 <factory> 2022 01 03 EN 362:2004/B,T <QRcode> - Stainless steel wear insert inside top.
↑ 493: Edelrid HMS Bulletproof Triple
- 109x75 mm., 85 g.
- Gate Opening: 24 mm., Clearance: 19 mm.
- kN ↔25 ↕9 ⱷ9 (H)
<iBook>CE2777 EDELRID
73727 0006 <factory> 2022 01 03 EN362:2004/B <QR code> - Stainless steel wear insert inside top.
↑ 024: Edelrid HMS Bulletproof Triple FG
- 109x75 mm., 88 g.
- Gate Opening: 24 mm., Clearance: 24 mm.
- kN ↔25 ↕9 ⱷ9 (H)
<iBook> CE2777 EDELRID
73728 2834 <factory> 2021 12 03 EN 362:2004/B,T <QRcode> - Stainless steel wear insert inside top.
↑ 494: Edelrid HMS Magnum Triple
- 120x75 mm., 86 g.
- Gate Opening: 22 mm., Clearance: 22 mm.
- kN ↔24 ↕8 ⱷ9 CE 0333
EDELRID (H)
<iBook> EN362:2004-B -71819- -88237- 0616-17-193-0158
↑ 495: Edelrid HMS Strike Screw II
- 99x68 mm., 59 g.
- Gate Opening: 21 mm., Clearance: 19 mm.
- CE 03330 kN↔22↕8ⱷ7(H)
EDELRID
73769-0366 <factory> 2022 05 <iBook> EN362:2004/B
↑ 496: Edelrid HMS Strike Screw FG II
- 99x68 mm., 62 g.
- Gate Opening: 21 mm., Clearance: 19 mm.
- CE 03330 kN↔22↕8ⱷ7(H)
EDELRID
73772-0064 <factory> 2022 04 <iBook> 0122 - Wire capture.
↑ 497: Edelrid HMS Strike Slider II
- 99x37 mm., 55 g.
- Gate Opening: 24 mm., Clearance: 19 mm.
- CE 03330 kN↔22↕8ⱷ7(H)
EDELRID
73771-0133 <factory> 2022 06 <iBook> 0322
↑ 498: Edelrid HMS Strike Slider FG II
- 99x67 mm., 57 g.
- Gate Opening: 24 mm., Clearance: 19 mm.
- CE 03330 kN↔22↕8ⱷ7(H)
EDELRID
73774-0720 <factory> 2022 02 <iBook> 0322 - Wire capture.
↑ 499: Edelrid HMS Strike Triple II
- 99x68 mm., 65 g.
- Gate Opening: 20 mm., Clearance: 18 mm.
- CE 03330 kN↔22↕8ⱷ7(H)
EDELRID
73770-0713 <factory> 2022 09 <iBook> 03225 EN362:2004/B
↑ 500: Edelrid HMS Strike Triple FG II
- 99x68 mm., 67 g.
- Gate Opening: 20 mm., Clearance: 18 mm.
- CE 03330kB↔22↕8ⱷ7(H)
EDELRID
73773-26330 <factory> 2022 09 <iBook> 0222 - Wire capture.
↑ 492: Edelrid HMS Bulletproof Belay FG Eco
- 117x72 mm., 87 g.
- Gate Opening: 27 mm., Clearance: 22 mm.
- CE 2777 kN↔20↕8ⱷ7
EDELRID <iBook>
73757 4016 <factory> 2022 04 02 (T)(H) - Stainless steel wear insert inside top. Wire capture.
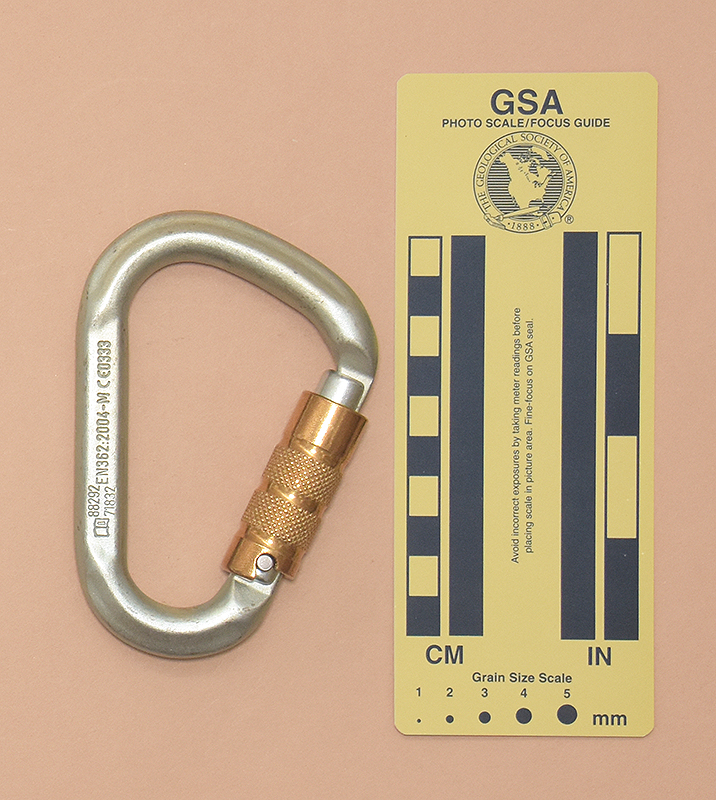
↑ 489: Edelrid Steel HMS Triple
- 112x75 mm., 250 g.
- Gate Opening: 23 mm., Clearance: 23 mm.
- <iBook>88292 71892 EN362-2004=M CE0333
152-0287EDELRID kN↔40↕15ⱷ15 <factory>2022-06
01 22
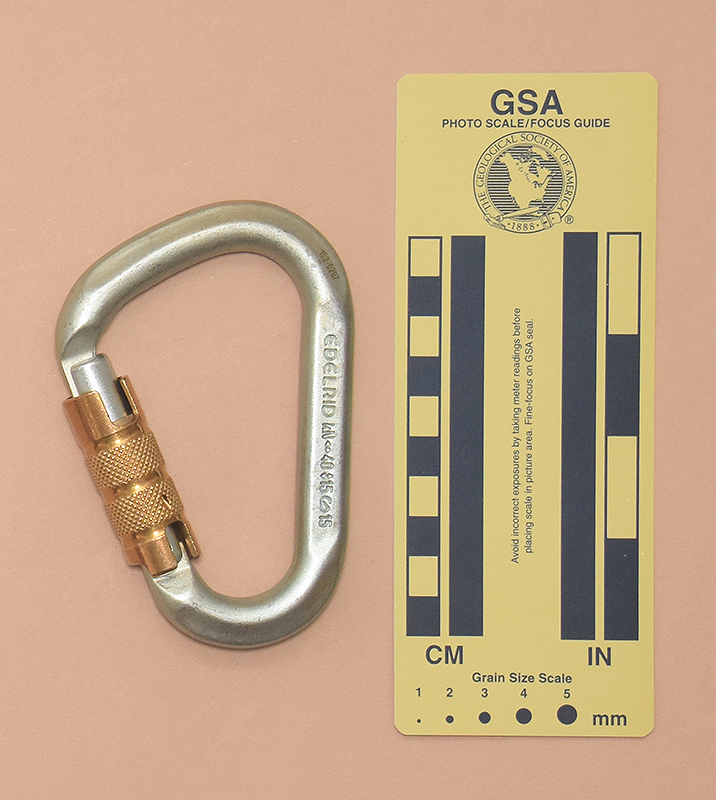
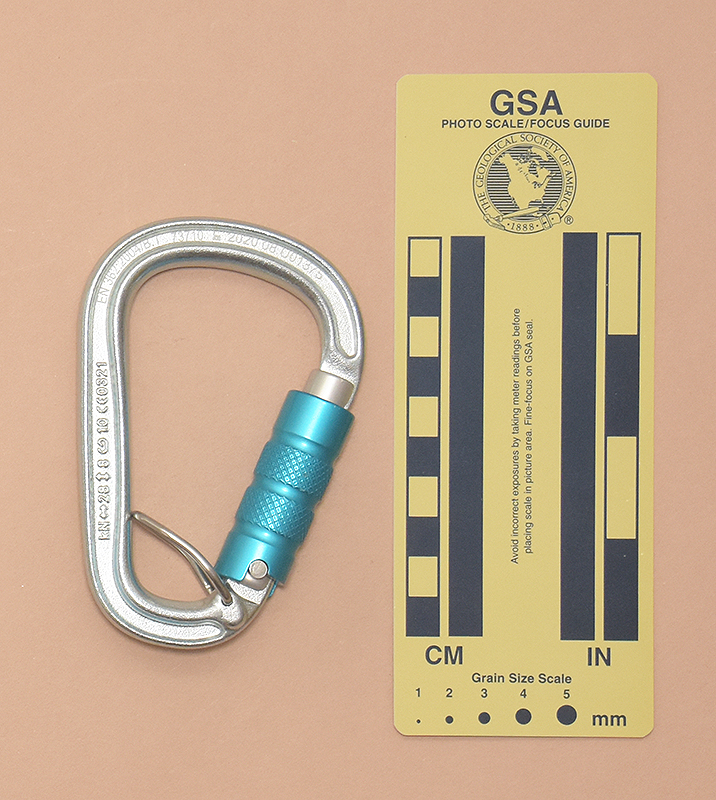
↑ 490: Edelrid HMS Bruce Steel FG
- 108x72 mm., 139 g.
- Gate Opening: 23 mm., Clearance: 23 mm.
- kN ↔28↕8ⱷ10 CE0321 EN362:2004/B,T 73710 <factory> 2020 08 U01375
(H)EDELRID<iBook>
EN362:2004/B,T 72006 <factory> 2019 02 U01087 - Wire capture.
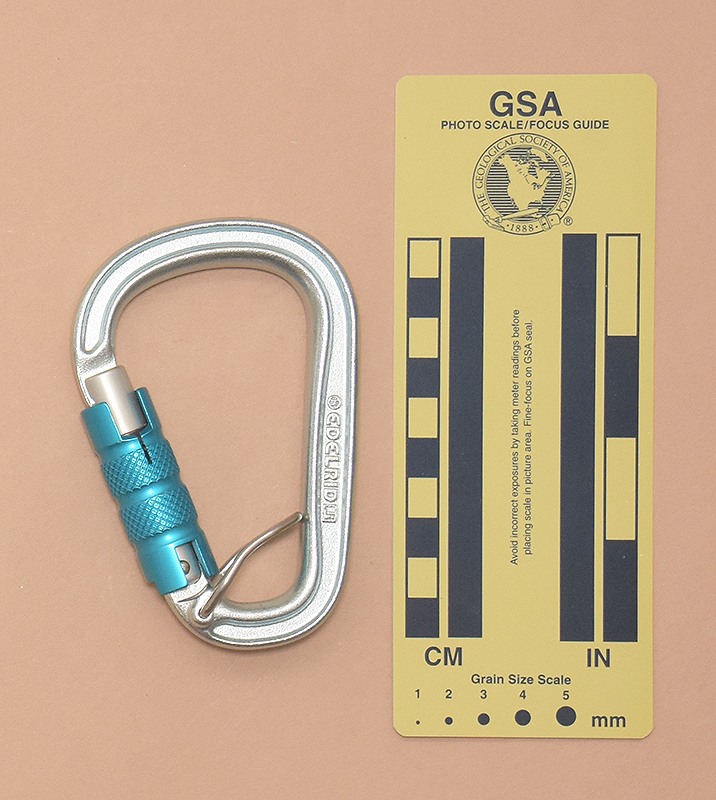
↑ 491: Edelrid HMS Bruce Steel Triple FG
- 108x72 mm., 143 g.
- Gate Opening: 22 mm., Clearance: 22 mm.
- kN ↔28↕8ⱷ10 CE0321
(H)EDELRID<iBook> - Wire capture.